- Docs Home
- About TiDB Cloud
- Get Started
- Develop Applications
- Overview
- Quick Start
- Build a TiDB Developer Cluster
- CRUD SQL in TiDB
- Build a Simple CRUD App with TiDB
- Example Applications
- Connect to TiDB
- Design Database Schema
- Write Data
- Read Data
- Transaction
- Optimize
- Troubleshoot
- Reference
- Cloud Native Development Environment
- Manage Cluster
- Plan Your Cluster
- Create a TiDB Cluster
- Connect to Your TiDB Cluster
- Set Up VPC Peering Connections
- Use an HTAP Cluster with TiFlash
- Scale a TiDB Cluster
- Upgrade a TiDB Cluster
- Delete a TiDB Cluster
- Use TiDB Cloud API (Beta)
- Migrate Data
- Import Sample Data
- Migrate Data into TiDB
- Configure Amazon S3 Access and GCS Access
- Migrate from MySQL-Compatible Databases
- Migrate Incremental Data from MySQL-Compatible Databases
- Migrate from Amazon Aurora MySQL in Bulk
- Import or Migrate from Amazon S3 or GCS to TiDB Cloud
- Import CSV Files from Amazon S3 or GCS into TiDB Cloud
- Import Apache Parquet Files from Amazon S3 or GCS into TiDB Cloud
- Troubleshoot Access Denied Errors during Data Import from Amazon S3
- Export Data from TiDB
- Back Up and Restore
- Monitor and Alert
- Overview
- Built-in Monitoring
- Built-in Alerting
- Third-Party Monitoring Integrations
- Tune Performance
- Overview
- Analyze Performance
- SQL Tuning
- Overview
- Understanding the Query Execution Plan
- SQL Optimization Process
- Overview
- Logic Optimization
- Physical Optimization
- Prepare Execution Plan Cache
- Control Execution Plans
- TiKV Follower Read
- Coprocessor Cache
- Garbage Collection (GC)
- Tune TiFlash performance
- Manage User Access
- Billing
- Reference
- TiDB Cluster Architecture
- TiDB Cloud Cluster Limits and Quotas
- TiDB Limitations
- SQL
- Explore SQL with TiDB
- SQL Language Structure and Syntax
- SQL Statements
ADD COLUMNADD INDEXADMINADMIN CANCEL DDLADMIN CHECKSUM TABLEADMIN CHECK [TABLE|INDEX]ADMIN SHOW DDL [JOBS|QUERIES]ALTER DATABASEALTER INDEXALTER TABLEALTER TABLE COMPACTALTER USERANALYZE TABLEBATCHBEGINCHANGE COLUMNCOMMITCHANGE DRAINERCHANGE PUMPCREATE [GLOBAL|SESSION] BINDINGCREATE DATABASECREATE INDEXCREATE ROLECREATE SEQUENCECREATE TABLE LIKECREATE TABLECREATE USERCREATE VIEWDEALLOCATEDELETEDESCDESCRIBEDODROP [GLOBAL|SESSION] BINDINGDROP COLUMNDROP DATABASEDROP INDEXDROP ROLEDROP SEQUENCEDROP STATSDROP TABLEDROP USERDROP VIEWEXECUTEEXPLAIN ANALYZEEXPLAINFLASHBACK TABLEFLUSH PRIVILEGESFLUSH STATUSFLUSH TABLESGRANT <privileges>GRANT <role>INSERTKILL [TIDB]MODIFY COLUMNPREPARERECOVER TABLERENAME INDEXRENAME TABLEREPLACEREVOKE <privileges>REVOKE <role>ROLLBACKSELECTSET DEFAULT ROLESET [NAMES|CHARACTER SET]SET PASSWORDSET ROLESET TRANSACTIONSET [GLOBAL|SESSION] <variable>SHOW ANALYZE STATUSSHOW [GLOBAL|SESSION] BINDINGSSHOW BUILTINSSHOW CHARACTER SETSHOW COLLATIONSHOW [FULL] COLUMNS FROMSHOW CREATE SEQUENCESHOW CREATE TABLESHOW CREATE USERSHOW DATABASESSHOW DRAINER STATUSSHOW ENGINESSHOW ERRORSSHOW [FULL] FIELDS FROMSHOW GRANTSSHOW INDEX [FROM|IN]SHOW INDEXES [FROM|IN]SHOW KEYS [FROM|IN]SHOW MASTER STATUSSHOW PLUGINSSHOW PRIVILEGESSHOW [FULL] PROCESSSLISTSHOW PROFILESSHOW PUMP STATUSSHOW SCHEMASSHOW STATS_HEALTHYSHOW STATS_HISTOGRAMSSHOW STATS_METASHOW STATUSSHOW TABLE NEXT_ROW_IDSHOW TABLE REGIONSSHOW TABLE STATUSSHOW [FULL] TABLESSHOW [GLOBAL|SESSION] VARIABLESSHOW WARNINGSSHUTDOWNSPLIT REGIONSTART TRANSACTIONTABLETRACETRUNCATEUPDATEUSEWITH
- Data Types
- Functions and Operators
- Overview
- Type Conversion in Expression Evaluation
- Operators
- Control Flow Functions
- String Functions
- Numeric Functions and Operators
- Date and Time Functions
- Bit Functions and Operators
- Cast Functions and Operators
- Encryption and Compression Functions
- Locking Functions
- Information Functions
- JSON Functions
- Aggregate (GROUP BY) Functions
- Window Functions
- Miscellaneous Functions
- Precision Math
- Set Operations
- List of Expressions for Pushdown
- TiDB Specific Functions
- Clustered Indexes
- Constraints
- Generated Columns
- SQL Mode
- Table Attributes
- Transactions
- Views
- Partitioning
- Temporary Tables
- Cached Tables
- Character Set and Collation
- Read Historical Data
- System Tables
mysql- INFORMATION_SCHEMA
- Overview
ANALYZE_STATUSCLIENT_ERRORS_SUMMARY_BY_HOSTCLIENT_ERRORS_SUMMARY_BY_USERCLIENT_ERRORS_SUMMARY_GLOBALCHARACTER_SETSCLUSTER_INFOCOLLATIONSCOLLATION_CHARACTER_SET_APPLICABILITYCOLUMNSDATA_LOCK_WAITSDDL_JOBSDEADLOCKSENGINESKEY_COLUMN_USAGEPARTITIONSPROCESSLISTREFERENTIAL_CONSTRAINTSSCHEMATASEQUENCESSESSION_VARIABLESSLOW_QUERYSTATISTICSTABLESTABLE_CONSTRAINTSTABLE_STORAGE_STATSTIDB_HOT_REGIONS_HISTORYTIDB_INDEXESTIDB_SERVERS_INFOTIDB_TRXTIFLASH_REPLICATIKV_REGION_PEERSTIKV_REGION_STATUSTIKV_STORE_STATUSUSER_PRIVILEGESVIEWS
- System Variables
- API Reference
- Storage Engines
- Dumpling
- Table Filter
- Troubleshoot Inconsistency Between Data and Indexes
- FAQs
- Release Notes
- Support
- Glossary
Configure Amazon S3 Access and GCS Access
If your source data is stored in Amazon S3 or GCS buckets, before importing or migrating the data to TiDB Cloud, you need to configure cross-account access to the buckets. This document describes how to do this.
Configure Amazon S3 access
To allow TiDB Cloud to access the source data in your Amazon S3 bucket, take the following steps to configure the bucket access for TiDB Cloud and get the Role-ARN. Once the configuration is done for one TiDB cluster in a project, all TiDB clusters in that project can use the same Role-ARN to access your Amazon S3 bucket.
In the TiDB Cloud Console, get the TiDB Cloud account ID and external ID of the target TiDB cluster.
In the TiDB Cloud Console, choose your target project, and navigate to the Clusters page.
Find the area of your target cluster and click Import Data in the upper-right corner of the area. The Data Import Task page is displayed.
TipAlternatively, you can also click the name of your cluster on the Clusters page and click Import Data in the upper-right corner.
On the Data Import Task page, click Show AWS IAM policy settings to get the TiDB Cloud Account ID and TiDB Cloud External ID. Take a note of these IDs for later use.
In the AWS Management Console, create a managed policy for your Amazon S3 bucket.
Sign in to the AWS Management Console and open the Amazon S3 console at https://console.aws.amazon.com/s3/.
In the Buckets list, choose the name of your bucket with the source data, and then click Copy ARN to get your S3 bucket ARN (for example,
arn:aws:s3:::tidb-cloud-source-data). Take a note of the bucket ARN for later use.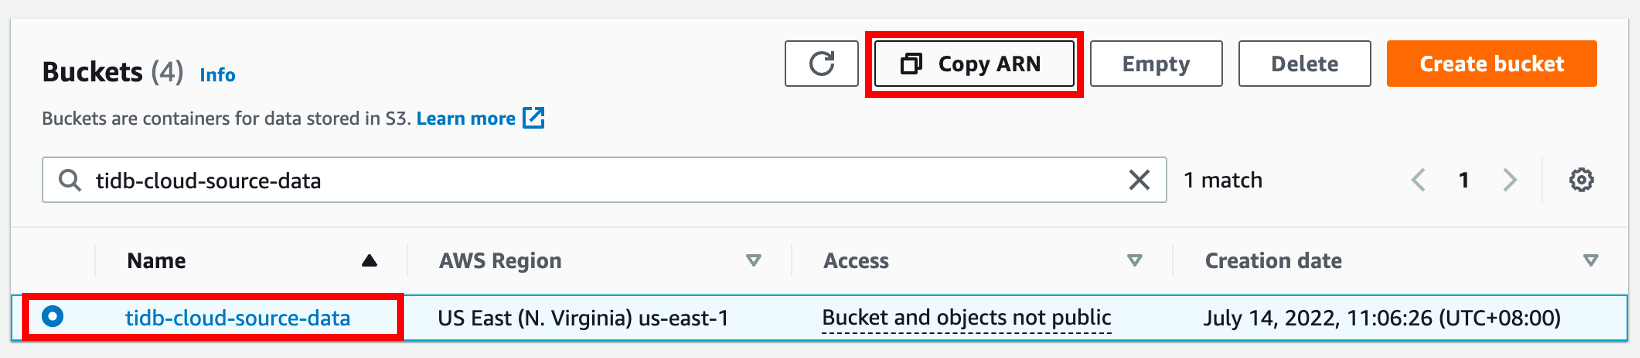
Open the IAM console at https://console.aws.amazon.com/iam/, click Policies in the navigation pane on the left, and then click Create Policy.
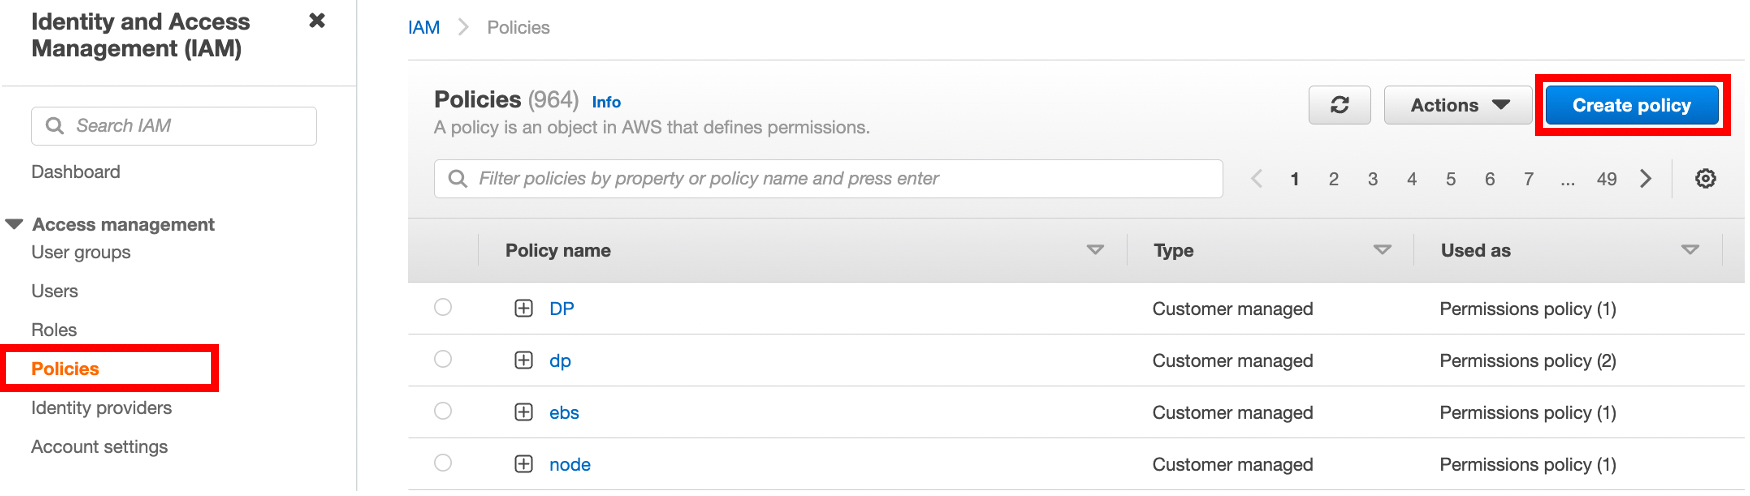
On the Create policy page, click the JSON tab.
Copy the following access policy template and paste it to the policy text field.
{
    "Version": "2012-10-17",
    "Statement": [
        {
            "Sid": "VisualEditor0",
            "Effect": "Allow",
            "Action": [
                "s3:GetObject",
                "s3:GetObjectVersion"
            ],
            "Resource": "<Your S3 bucket ARN>/<Directory of your source data>/*"
        },
        {
            "Sid": "VisualEditor1",
            "Effect": "Allow",
            "Action": [
                "s3:ListBucket",
                "s3:GetBucketLocation"
            ],
            "Resource": "<Your S3 bucket ARN>"
        }
    ]
}
In the policy text field, update the following configurations to your own values.
"Resource": "<Your S3 bucket ARN>/<Directory of the source data>/*"For example, if your source data is stored in the root directory of the
tidb-cloud-source-databucket, use"Resource": "arn:aws:s3:::tidb-cloud-source-data/*". If your source data is stored in themydatadirectory of the bucket, use"Resource": "arn:aws:s3:::tidb-cloud-source-data/mydata/*". Make sure that/*is added to the end of the directory so TiDB Cloud can access all files in this directory."Resource": "<Your S3 bucket ARN>"For example,
"Resource": "arn:aws:s3:::tidb-cloud-source-data".
Click Next: Tags, add a tag of the policy (optional), and then click Next:Review.
Set a policy name, and then click Create policy.
In the AWS Management Console, create an access role for TiDB Cloud and get the role ARN.
In the IAM console at https://console.aws.amazon.com/iam/, click Roles in the navigation pane on the left, and then click Create role.
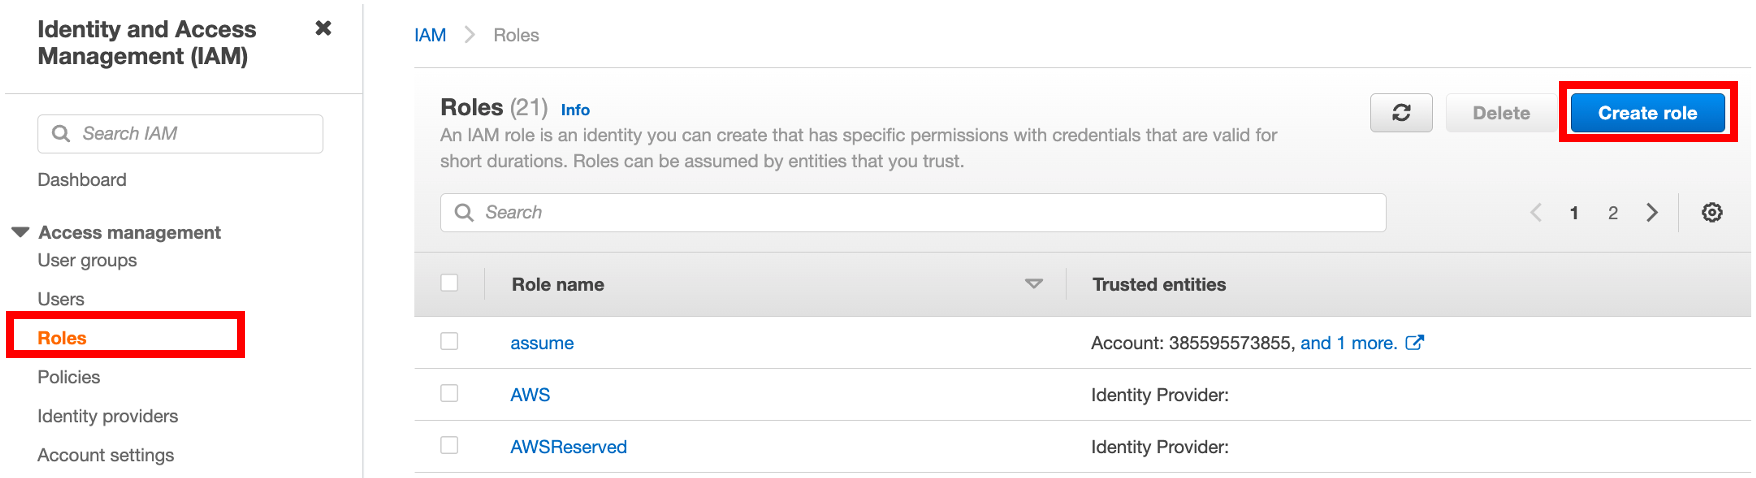
To create a role, fill in the following information:
- Under Trusted entity type, select AWS account.
- Under An AWS account, select Another AWS account, and then paste the TiDB Cloud account ID to the Account ID field.
- Under Options, click Require external ID (Best practice when a third party will assume this role), and then paste the TiDB Cloud External ID to the External ID field.
Click Next to open the policy list, choose the policy you just created, and then click Next.
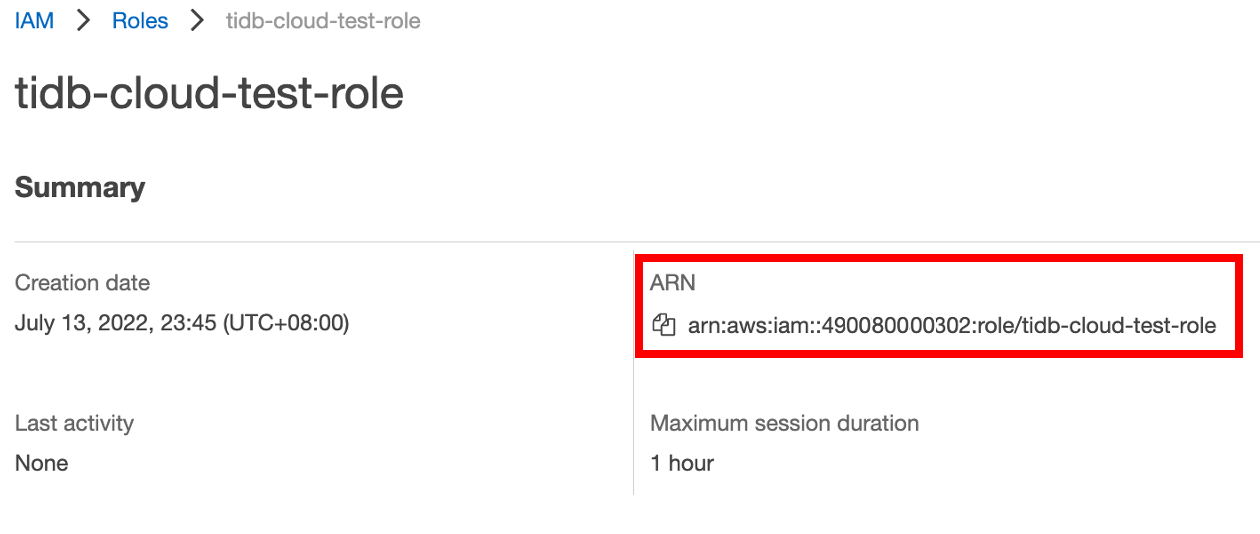
Under Role details, set a name for the role, and then click Create role in the lower-right corner. After the role is created, the list of roles is displayed.
In the list of roles, click the name of the role that you just created to go to its summary page, and then copy the role ARN.
In the TiDB Cloud console, go to the Data Import Task page where you get the TiDB Cloud account ID and external ID, and then paste the role ARN to the Role ARN field.
Configure GCS access
To allow TiDB cloud to access the source data in your GCS bucket, you need to configure the GCS access for each TiDB Cloud as a service on the GCP project and GCS bucket pair. Once the configuration is done for one cluster in a project, all database clusters in that project can access the GCS bucket.
Get the Google Cloud Service Account ID of the target TiDB cluster.
- In the TiDB Cloud Admin console, choose a target project and a target cluster deployed on the Google Cloud Platform, and then click Import Data in the upper-right corner.
- Click Show Google Cloud Service Account ID, and then copy the Service Account ID.
In the Google Cloud Platform (GCP) Management Console, go to IAM & Admin > Roles, and then check whether a role with the following read-only permissions of the storage container exists.
- storage.buckets.get
- storage.objects.get
- storage.objects.list
If yes, you can use the matched role for the target TiDB cluster in the following steps. If not, go to IAM & Admin > Roles > CREATE ROLE to define a role for the target TiDB cluster.
Go to Cloud Storage > Browser, select the GCS bucket you want TiDB Cloud to access, and then click SHOW INFO PANEL.
The panel is displayed.
In the panel, click ADD PRINCIPAL.
The dialog box for adding principals is displayed.
In the dialog box, perform the following steps:
- In the New Principals field, paste the Google Cloud Service Account ID of the target TiDB cluster.
- In the Role drop-down list, choose the role of the target TiDB cluster.
- Click SAVE.
Your TiDB Cloud cluster can now access the GCS bucket.
To remove the access to TiDB Cloud, you can simply delete the principal that you added.